Structured Message Quick Start
Let's build a structured message! A structured message consists of elements that enhance the customer experience. Want to try it out yourself? Follow this structured message demo to see how it is done.
In this Quick Start, we will walk you through creating a structured message within a matter of minutes. Let's get started.
Create an Engage Messaging Channel
For this Quick Start, we need to create a channel and then assign an agent to that channel. There are several steps in this process starting with the community.
Configure a Community
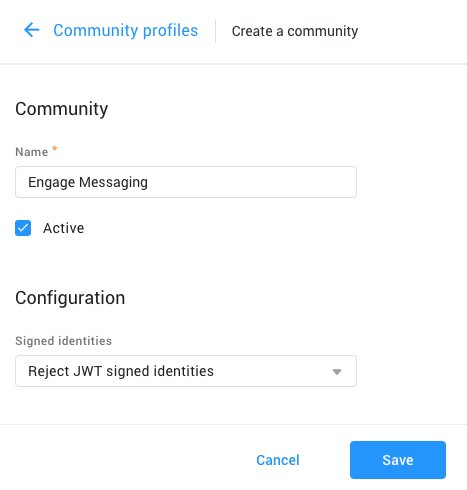
Communities are databases of identities associated with each source. There must be a community in order to create a source. You can create a community per type of source (Facebook, Twitter, Engage Messaging, etc.), which can then be used when creating several sources of the same type. Follow the instructions to create a community. In this Quick Start, we'll create an Engage Messaging community profile.
Simply give this community a name and click Save
Configure an Engage Messaging Channel
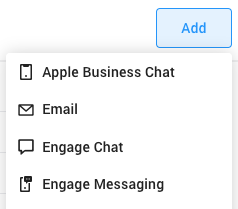
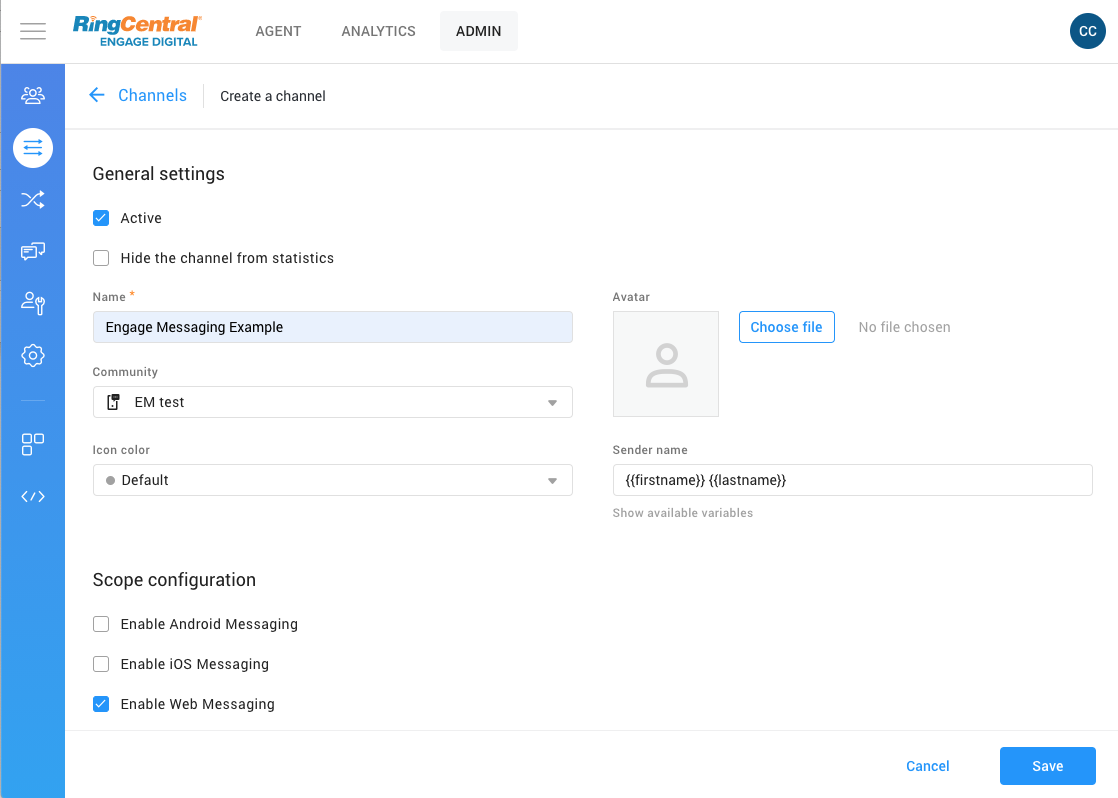
In this quick start, we begin with the Engage Messaging channel. Follow the instructions to navigate to and create a channel for Engage Messaging.
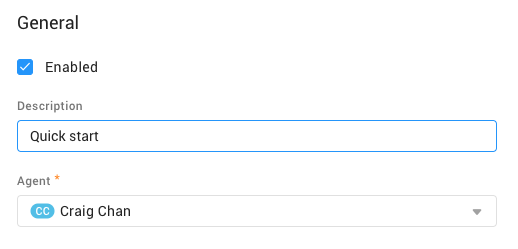
Give this channel a name. For our example here, we'll call it "Engage Messaging Example". Make sure to select the community you just created. While here, let's enable web messaging by checking the "Enable Web Messaging" box.
Set Agent Permissions to the Channel
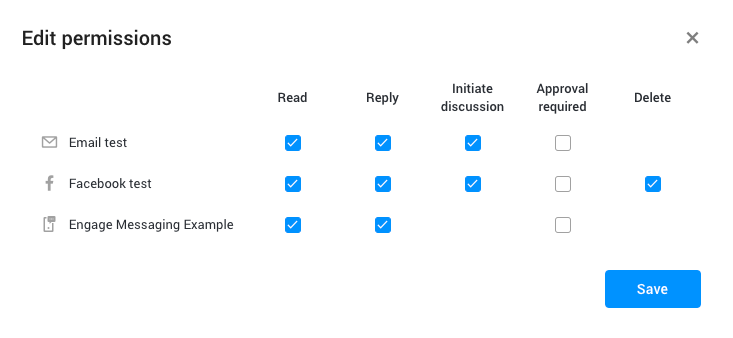
For agents to interact with messages from a channel, make sure to set the proper permissions for that agent. In this instance, you are making sure your agent has read and reply permissions. Just check both boxes to make sure your agent can receive and respond to messages.
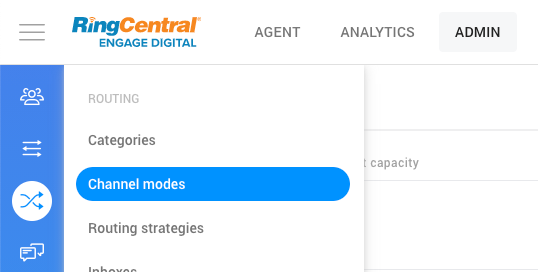
Configure Channel Mode
There are three types of channel modes: asynchronus, real time, and triage. For our testing purposes, we want real time, but for some interactions, the channel mode could be asynchronus (when responding to email for example). Find the channel mode settings under Routing, and then configure your channel mode.
Now let's add our Engage Messaging Example to the real time channel. First click the pencil icon to edit the real time channel.
Note
These channel modes can be renamed to a custom name and may not be the name used for the real time mode. For our Quick Start, we are using the default channel mode name.
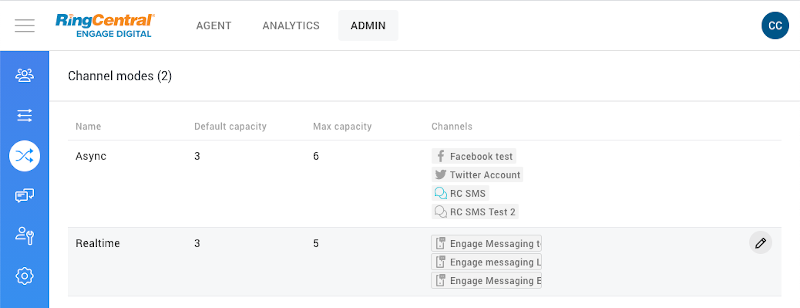
Then add our Engage Messaging Example in the Channels field by selecting it from the dropdown.

Now let's go back to our Engage Messaging Example channel listed in the channels section. Click the pencil icon to edit this channel and look for the JavaScript code under "Chat connection", in the "Code to include" field. We will use this code in the next section to embed a messaging window on a web page.
Create an Engage Chat Window on a Web Page
Now let's create an HTML web page with the JavaScript code to include. The code should look something like the following.
Code to include
<script>
  (function(d) {
    var cm = d.createElement('scr' + 'ipt'); cm.type = 'text/javascript'; cm.async = true;
    cm.src = 'https://example.chat.digital.ringcentral.com/chat/8e5321aaeb72373cde85a9bb/loader.js';
    var s = d.getElementsByTagName('scr' + 'ipt')[0]; s.parentNode.insertBefore(cm, s);
  }(document));
</script>
We'll want to embed this code segment into an HTML page so we can start a Engage Messaging chat window. Here's some sample code to create your own web page with.
Sample HTML
<!DOCTYPE html>
<html lang="en">
    <head>
        <meta charset="utf-8">
        <title>Engage Messaging</title>

        <script>
            //script from the source
            (function(d) {
              var cm = d.createElement('scr' + 'ipt'); cm.type = 'text/javascript'; cm.async = true;
              cm.src = 'https://example.chat.digital.ringcentral.com/chat/8e5321aaeb72373cde85a9bb/loader.js';
              var s = d.getElementsByTagName('scr' + 'ipt')[0]; s.parentNode.insertBefore(cm, s);
            }(document));
        </script>
    </head>
</html>
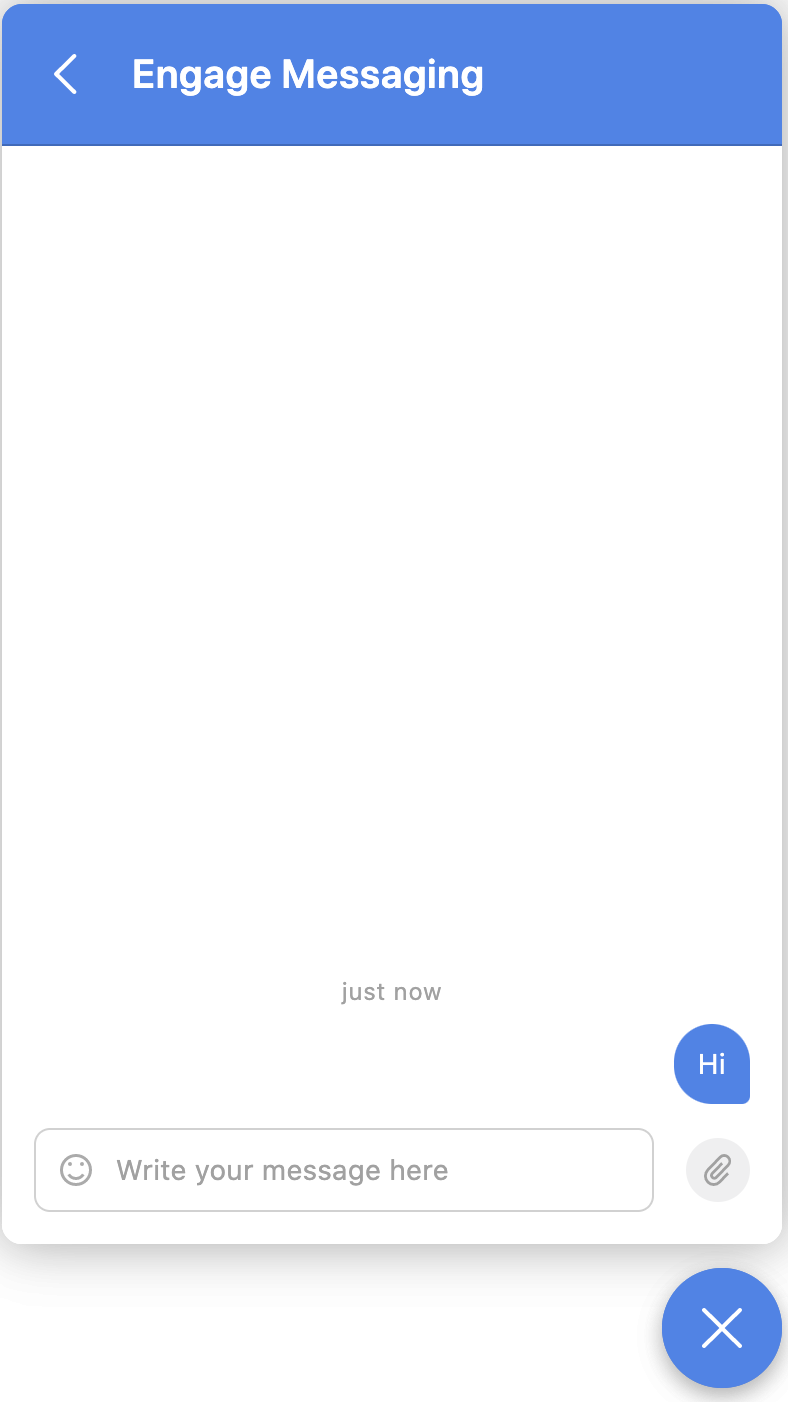
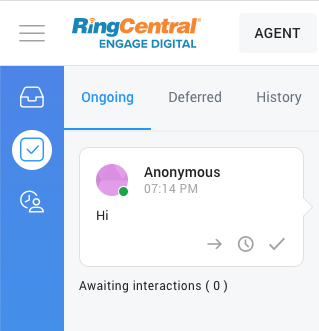
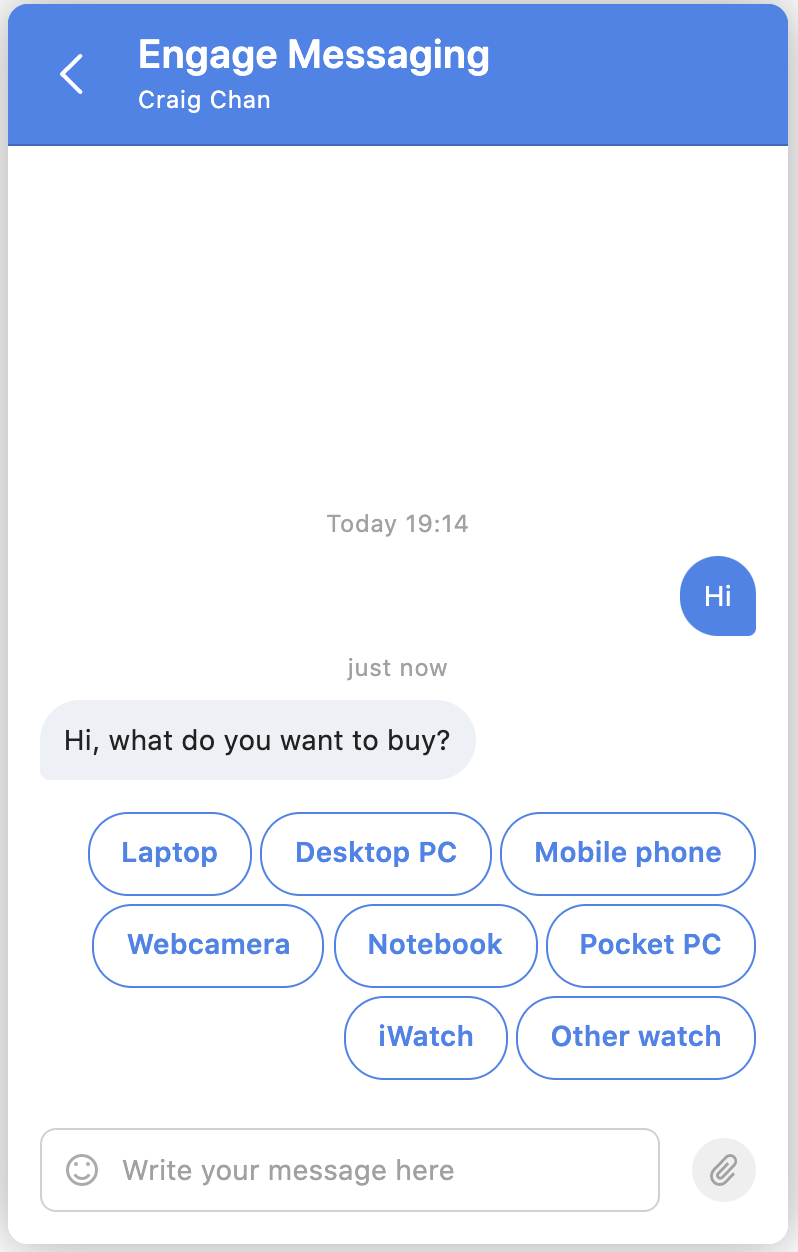
With this web page, you'll find the chat window hidden in the bottom right of the page as a blue circle with a couple of bubbles in it. Click on this and you can begin typing messages to your agent. To begin the conversation, start with a simple "Hi". That message will be routed to the agent so make sure you click on "Agent" and then "Routing mode" to see the message.
Customer Chat
Agent View
Sending a Structured Message
Here's the point you've been building up to, sending a structured message using an API call. You'll need two things to send a structured message:
- API Access Token
- In Reply To ID (or
in_reply_to_id)
Obtain Access Token
The first thing you need to do is obtain an API Access Token if you do not already have one. Access tokens can be created and/or accessed via the "API access token" area in the "Dev tools" area of your Engage portal under the "Admin" tab.
How to generate an Engage API access token
-
Login to your Engage portal and click on the "Admin" menu located in the top, horizontal menu.
-
Select "Dev tools" towards the bottom of the left hand menu.
-
Select "API access tokens" from the drawer that pops out.
-
You should see a list of access tokens if any have been provisioned. Select the token, or click the "Add" button to create a new one.
-
Finally, enter a label/description for your token, and select an Agent on which the token will act on behalf of. Make sure the token is "enabled" and click "Save."
Make note of the access token generated as you will need it later.
Find the In Reply To ID
To find the In Reply To ID, you need to create a webhook and with the specific event content.imported and look for the field events[0].resource.id.
{
    "id": "bda9269a261a4a489952c104",
    "domain_id": "5dd2be0e103cc800092e184c",
    "events": [
        {
            "type": "content.imported",
            "id": "5fbeb3195eca7b0007f5e586",
            "issued_at": "2020-11-25T19:40:09.196Z",
            "resource": {
                "type": "message",
                "id": "5fbeb319535778000776a8da",
                "metadata": {
                    "approval_required": false,
                    "author_id": "5fbd5affc9215d0007851a11",
                    "body": "hi",
                    "body_input_format": "text",
                    "category_ids": [],
                    "creator_id": null,
                    "date": "2020-11-25",
                    "first_in_thread": false,
                    "foreign_categories": [],
                    "foreign_id": "b80117cd-f928-43fb-a098-0629b1042e85",
                    "has_attachment": false,
                    "intervention_id": null,
                    "in_reply_to_author_id": null,
                    "in_reply_to_id": null,
                    "language": "en",
                    "source_id": "5fbd57d00b9c80000c35bd52",
                    "status": "new",
                    "thread_id": "5fbea72adbad580006ed3982",
                    "thread_title": "hi",
                    "created_from": "synchronizer",
                    "private": true,
                    "context_data": null,
                    "structured_content_supported": true,
                    "foreign_origin": "web"
                }
            }
        }
    ]
}
Post Structured Message
Now post the following code to create the structured message reply. Note that the {access_token} and {in_reply_to_id} are the two elements you just found.
curl -X POST "https://[YOUR DOMAIN].api.digital.ringcentral.com/1.0/contents" -H "Authorization: Bearer {access_token}"
{
    "in_reply_to_id": "{in_reply_to_id}",
    "body": "Hi, what do you want to buy?",
    "structured_content": {
        "center_items": false,
        "disable_text_input": false,
        "type": "select",
        "items": [
            { "title": "Laptop" }, { "title": "Desktop PC" }, { "title": "Mobile phone" }, { "title": "Webcamera" }, { "title": "Notebook" }, { "title": "Pocket PC" }, { "title": "iWatch" }, { "title": "Other watch" }
        ]
    }
}
Your output should look like the following.
Need Help?
Having difficulty? Feeling frustrated? Receiving an error you don't understand? Our community is here to help and may already have found an answer. Search our community forums, and if you don't find an answer please ask!
What's Next?
When you have successfully made your first Structured Message API call, it is time to take your next step towards building a more robust Engage application.